If Your Recipes are Everywhere…Watch This!
If you have piles of printed recipes sitting in drawers, folders, or random stacks, this simple system will help you finally organize them without getting overwhelmed! In this post, I’m sharing the exact method I use to organize years of recipes in one afternoon, without complicated categories or fancy supplies. If you need HELP with your recipes, keep reading, or watch the video here!
![]()
How to Organize Piles of Recipes Without Overthinking It
We need to talk about those big piles of recipes sitting around your house. You know the ones. Printed recipes, magazine tear-outs, handwritten cards, and random pages you fully intended to organize someday.
If you’re anything like me, you probably have a big vision for how it’s all going to work. A perfectly categorized binder. A beautiful digital system. Everything searchable and coordinated.
And that big vision is usually the problem.
When we try to make recipe organization perfect from the start, we get stuck and never actually do it. So today I want to show you how I organize years and years of printed recipes in one afternoon, using a system that actually works. The key is following these steps exactly and keeping it simple!
Step One: Gather Your Recipes

Start by gathering up your recipes. If they’re already in one spot, that’s great. If not, just collect a pile and get started.
You do not need to gather every single recipe you own from every corner of your house before you begin. That alone can stop the process before it starts. Grab a stack and move forward. You can always add more later!
Step Two: Only Two Categories
This part may sound strange, but trust me.
You are only allowed two categories:
-
Dessert
-
Not dessert
That’s it.
No chicken vs slow cooker vs holidays vs healthy LOL! Printed recipes can’t be tagged multiple ways like digital files, and the more complicated the categories become, the more overwhelming the project feels.
By limiting yourself to dessert and not dessert, you eliminate decision fatigue and keep momentum going. Simple is the goal here!
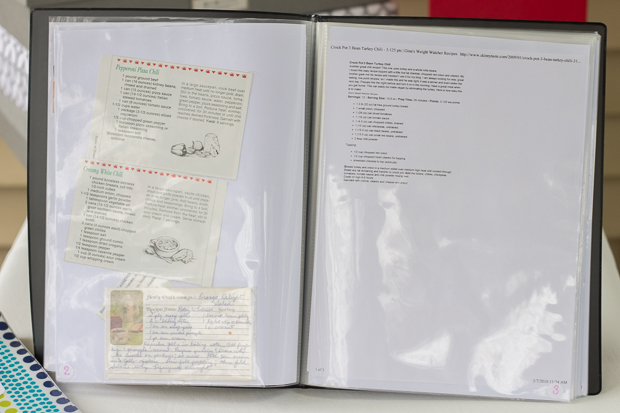
Step Three: Use a Presentation Binder

Next, grab what’s often called a presentation binder or display book. It looks similar to a three-ring binder, but it’s slimmer and already filled with page protectors.
You’ll want one binder for desserts and one for non-desserts. You can label them if you want, but it’s not required. I didn’t even bother labeling mine at first!
Start with one category and begin sliding the recipes into the page protectors. If a recipe is printed on one side only, try to pair it with another recipe so you can use both sides of the page protector. If it’s printed front and back, just slip it in on its own.
Once the recipes are in the binder, you should be able to cook directly from them without pulling them back out.
A Few Tips for Loading Recipes
It may take a couple of tries to get the hang of sliding pages in easily. I like to flip the binder sideways and gently bend the paper before inserting it. That makes it slide in much more smoothly.
Magazine tear-outs fit just fine, even if there’s extra space in the page protector. That’s okay. The goal is progress, not perfection!
Once you finish one category, move on to the other. When the recipes are in the binders, you’re done. Your recipes are officially organized, and they are far more usable than they were before!
Optional Enhancements (Only If You Want Them)
At this point, you can stop. Seriously! Everything else is optional.
If you want to take it up a notch, you can add page numbers. Some people use stickers, and others write directly on the page protectors with a Sharpie. Writing works, but you’ll need to let the ink dry to avoid smearing. That’s why I prefer the sticker method.
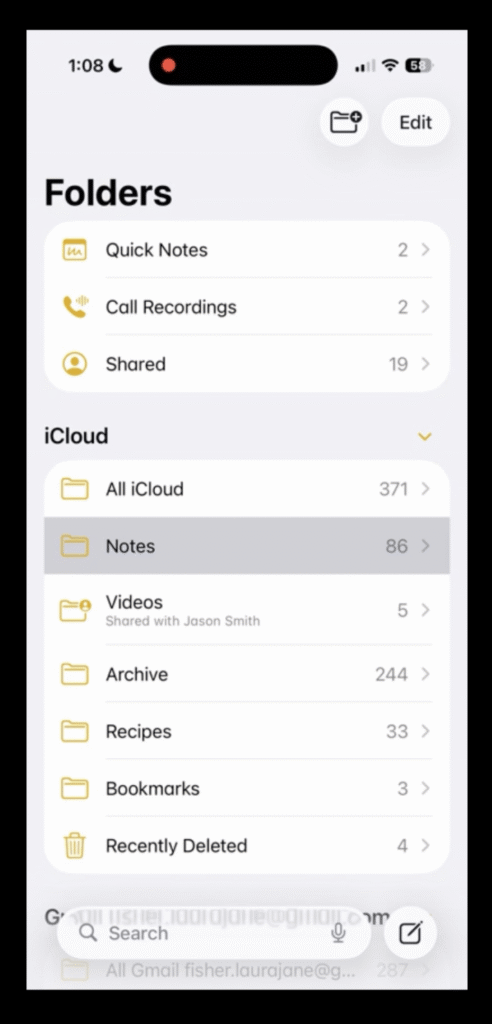
Once you have page numbers, you can create an index. You can do this on paper and slip it into the front of the binder, but I prefer a digital index in the notes app on my phone.
I list the recipe name and page number so I can quickly search and find what I need. This is especially helpful if you end up with multiple binders.
What If You Have Multiple Recipe Binders?
If you have a lot of recipes, you may end up with more than one dessert binder. Instead of restarting page numbers in each book, I recommend continuing the numbering across volumes.
For example, if volume one ends on page 60, volume two starts on page 61. You can note the page range on the spine so you know exactly which binder to grab.
This makes the digital index even more powerful.
Want to Go Even Further?
If you really want to level things up, you can add tags to your digital index. For example, you might tag recipes as healthy, crockpot, chicken, or beef.
Then, when you search within your notes app, you can quickly pull up recipes that match what you’re looking for. Again, this is optional. Your recipes are fully organized even without it.
What About Recipe Cards?
If you only have a few recipe cards, you can slide them directly into a page protector. But if you have a lot, they won’t stay in place very well.
Instead, tape them onto regular printer paper. Removable adhesive squares work great if you want the option to remove them later. Three recipe cards usually fit on one sheet of paper, and you can fit even more if you use both sides.
Once taped down, slide the paper into a page protector like everything else.
Magazine Tear-Outs and Odd Sizes
For magazine pages and larger recipes, don’t overthink it. Slide them straight into the page protector and move on.
Extra space is fine. Getting it done is what matters!
What About Digital Recipes?
For now, we’re not printing anything.
Start with what you already have printed and get that organized first. If you decide later that you want to print digital recipes and add them to your binders, you absolutely can.
Organizing digital recipes is a separate project and deserves its own process. I’ll be sharing that in a future video and post!
Happy organizing,
Laura 💛


 Copyright 2026, Get Organized HQ.
Mary Says
Oh my gosh!! I so NEED to do this ASAP!! My recipes are a disaster! I never can find any of them!! They are all just dumped in a drawer currently. Thanks so much for this post!!
Rose Says
Great idea! Thanks!
Jeanne Says
I got my binders Laura! Purged alot of recipes and divided by Baked Goods and Salads, Sides and Main dishes . 2 binders is perfect! Love space savings!
Claire Says
This makes it so do-able! Thanks for freeing us all to be able to get out of our frozen state of leaving them in our drawers, folders, etc. and really get them organized without a lot of effort.
You provide a valuable service to those off us that just can’t think of how to get out of our rut, and don’t want to spend a lot of money. We really appreciate that you don’t recommend a lot of high-end products. We all have products at home, and to be able to use them is also what we need. We are probably a group of women with loads of failed buys!!
Thank you so very much!!