How to Organize Digital Photos
04Let’s talk about how to organize digital photos. Of course, we don’t like big piles of disorganized paper or photos hanging out all over our office, but what about digital photos? Fortunately, they are less visible, but it’s no less frustrating not to be able to find a file or a photo that we need!
Let me start by saying that I’m certainly not an expert in this arena and I’ve had my fair share of photo organizing mistakes, but I have learned a few things, and I do finally have a system for organizing my digital photos that is working for me! In this case, I really believe the simpler and more straightforward the better. I’ve tried more advanced, complicated systems, and, trust me, they just fall apart. Here are the steps for getting your digital photos in order.

Before we dive into the system, it’s helpful to take a minute to consider the end goal. Why do you take photos? How do you plan to use the photos? This will obviously influence what photo organizing system would work best for you. It can also change some over the years.
For example, I used to take a lot of photos with my big, DSLR camera, but I now take most family photos with just my iPhone. Here’s why: I use a really simple app for creating photo books, and it’s WAY easier to do when the photos are already on my phone. When I took photos with my big camera, I had to transfer them to the computer, edit them, and then transfer them to my phone – which means I got way behind.
I decided I would much prefer a simple photo book with iPhone only photos that was actually DONE rather than a more elaborate book with fancy photos that never got completed.
Step 1: Start from This Point Forward
If your digital photos on your computer are a total mess and you really don’t have a system to organize them, or if your current system isn’t working for you, I do NOT recommend that you start by trying to reorganize all your previous digital photos. That can be a very daunting task that is likely to take you quite a while. Also, you’re more likely to put off starting an organizing system if you think you’ll have to start by spending hours and hours reorganizing your older files. I highly suggest you just start TODAY organizing your files with your new system. Any photos you take from this point forward will fit into the new system. Don’t worry so much about prior photos. You might get to them someday, and even if you never do, it will be so much better to have everything front this point forward all organized.
Step 2: The Delete Key is Your Friend!
No matter what system you choose, the delete key will always be your friend. Don’t be afraid to use it. Sometimes we think that because our files aren’t taking up literal physical space that it’s okay to keep everything. It’s still clutter, though. If you keep every digital photo, your hard drive will fill up quickly plus it will be a lot harder to find what you need. If you see a photo that is blurry or unusable, just delete it. If you take 12 shots of the exact same thing, delete 11 of them and only keep your favorite. I don’t overthink this or spend hours deciding what to delete. I’ve just formed the habit of always deleting blurry or way too dark photos. That only takes a second. And then if I am choosing certain photos out of a group, I go ahead and delete the ones I didn’t choose.
I do this both on the computer and on my phone. If I take 14 shots of the same thing, I try to delete 13 of them RIGHT AWAY. This is a game changer. I go through my phone photos at least once a week to delete any that aren’t my favorite. This both frees up storage space and makes it much easier to create my photobooks, because I’m not weeding through tons of photos or trying to agonize over which shot is my favorite.
Step 3: Choose a Very Simple File Structure
I know this from personal experience, but a very simple file structure for your photos will be most likely to work best long term. I wouldn’t suggest some fancy way of naming, categorizing, and tagging everything. For one thing, if your system takes you 15 minutes every time you import photos, you’re more likely to be in a hurry and not stick with it. Also, if you don’t have a straightforward way of naming folders, it can actually be harder to find what you’re looking for.
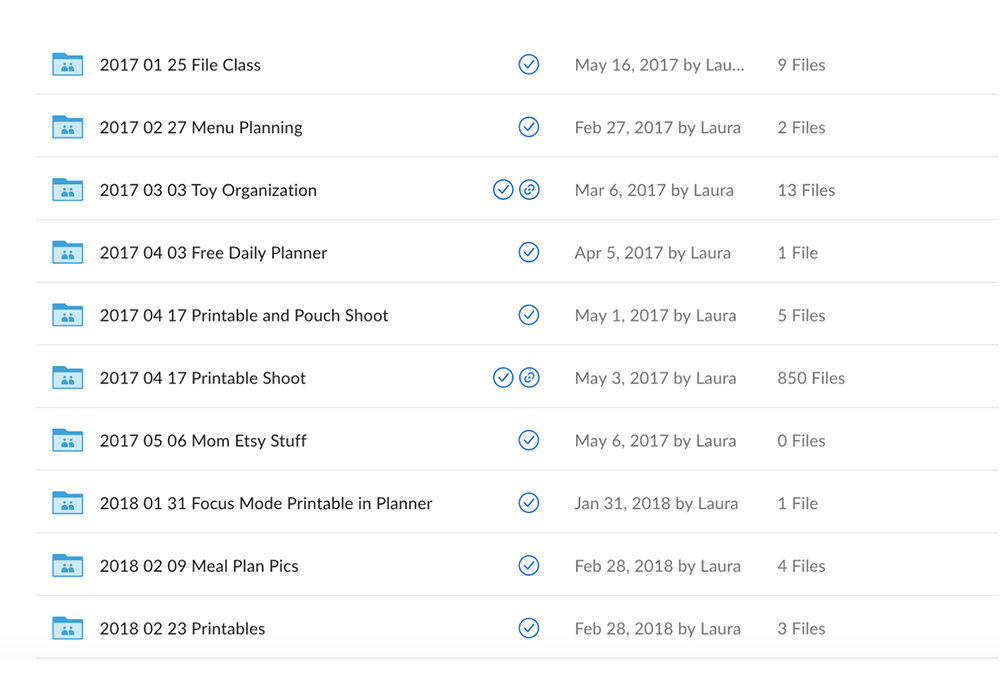
Here’s what I do. Each time I import photos, I name the folder with the today’s date first. I use the format of year-month-day, like 2014-01-31. I highly recommend that you do put the year first so you can easily look at all the folders in chronological order. (If you did something like 01-31-2014, then by the time a lot of years went by you’d end up with all the January’s from every year together, the all the February’s, etc.) I also recommend using leading zero’s in front of the months and days (like 01 instead of 1 for January). This will also ensure everything can easily be sorted in chronological order.
When I want to add more description, I will put a title of the event after the year. That would look like “2014-01-31 Planner Post Pics.” Also, I try to upload photos often, but sometimes I go a month or two without uploading. When I finally get around to it, there might be five or six different events that I’m importing. In that case, I do NOT separate the events. This takes too long, and I know I won’t keep up with it. I just put the date that I’m uploading. When I’m looking through folders I know that the folder could contain anything from the previous dated folder up to that date. In the example below, I know that “2013-11-17 Planners” could actually contain anything from November 3rd through the 17th, and it’s super easy to see that at a glance. Here’s what my current files look like:
 I find that using the date is the most straightforward method. I usually know the approximate date when things happened and there’s no ambiguity.
Step 4: Use Your Photos
It’s so, so important to actually do something with your photos. You didn’t take them just so that they can hang out on your hard drive. Print them, hang them, put them in an album, etc.
There are a lot of different ways to use your photos, but these days I’m loving the Project Life App by Becky Higgins (just search “Project Life” on the app store). Using the app, you can create a photo book right on your phone. Ideally, I like to keep up as I go. So I’m gradually creating new pages and staying constantly caught up (but that doesn’t always happen). This makes it so quick and easy.
Photo Organizing Software
There is software that can help you do this. I personally use Lightroom these days, but I’m guessing most of you don’t have that program. (If you do have Lightroom and want me to do a tutorial on my Lightroom workflow, let me know.)
If you have a Mac, iPhoto does this very well. I really love iPhoto, and if I didn’t have Lightroom, I would definitely use nothing but that. It automatically pulls in all your photos, organizes them by date, and splits them into events. You can order prints directly from iPhoto and do minor edits.
How do you organize your photos? Do you struggle with actually getting them into albums like I do? What are your favorite programs to use?
Get Organized

Sign up to receive the free Get Organized Once and For All ecourse.


 Copyright 2024, Get Organized HQ.
sherrie Says
Thank you sooooo much for this post!!! You are always such a great help!!!! I now feel like I have a game plan instead of the dreaded “where do I begin” feeling! Thank you again!
LauraJane Says
Post authorSo glad you’re inspired to tackle your photos! Let me know how it goes.
shelly m Says
I’m always interested to see how others organize their digital pics. I’m also great at taking pics, organizing them, but not using them! My system is pretty generic, but very helpful. I have folders for each year, and then within each folder I have 1 folder for each month + 1 folder I create called “best of …” That last folder holds all the pics that I really liked throughout the year. I used to separate out more events, but like you, I generally know when the picture was taken, so I know which monthly folder to look in. The monthly folders are all sorted by date. If we take a special vacation, I will create a separate folder for that event and keep it within the correct monthly folder. This system has been working for me since 2006!
LauraJane Says
Post authorSounds like a really good system. I love the “best of” idea. I think just doing that will get you a step closer to getting the pictures printed or creating an album.
alys Says
I use Picasa and have for several years. I’m a big fan. I’ve also kept scrapbooks for years, but as my boys age and I have fewer photos, that has dropped off too.
LauraJane Says
Post authorI also used Picasa for years – it’s a great program!
Renee Spindle Says
Thanks for a great post. I love Picasa myself, and find it’s a good way to collect the photos that my husband and I both take.
I always have to remind myself to take family photos at our get togethers. It’s easy to get caught up in the moments without a camera in hand.
Catherine Says
We organize our photos digitally by year, and within each year by quarter. We do separate folders for special vacations or big events (ie family reunion), within the annual folder. We back up everything on Carbonite. The only downside of being the family photographer is that I’m rarely in a picture!
LauraJane Says
Post authorSounds like a great system. I love how you break down by quarter and event. Since writing this post, I’ve actually started backing up using Crashplan. It feels so great to know my photos are backed up. I know, I’m rarely in pictures either. I try to set up the tripod.
Ramie Says
I have the same file structure that you do for photos! I love it and I love using iPhoto to get them separated quickly by event! I am trying to branch out and use Lightroom more, but it totally confuses me everytime I open it. Would you mind sharing your workflow? I’d love to see it.
Thank you!
LauraJane Says
Post authorI also love the way iPhoto organizes photos by event, but I absolutely hate how you can’t actually to the iPhoto photos outside of iPhoto. It’s a deal breaker for me. I wish they would change that, and it would be perfect. I took a class on how to use Lightroom from KelbyOne that I definitely recommend. It helped me a lot in figuring out how to use it.
Caitlin Says
I love iphoto but once you put your photos in there, you can’t go into your folders and pull out a specific photo. Iphoto packages it all up into your library. Any suggestions on how to get around that? It makes it hard to take those folders and put them on an external hard drive for back up!
LauraJane Says
Post authorI hate that too and haven’t found a way around that. That’s why I don’t use iPhoto, and only use Lightroom. I have even my phone photos set up to automatically import into Lightroom. It’s really a shame, because I love iPhoto other than that big problem.
Caitlin Says
Lightroom has to be paid for every year?? I figured it would just be software that you can purchase?
Lisa Says
You can Access iPhoto picture files and originals via osxdaily.com
You can open/ pictures/ and locate the “iPhoto library” file
Right-click and select “Show Package Contents”
Navigate to “Masters” or “Originals” to find your original iPhoto pictures
Danielle Says
Thank you so much for this! I have been taking tons of the same pic of my 1st grandchild! I am going to have to introduce myself to delete. I am an Android/pc girl, can you suggest any apps or programs for me? Thanks!!
Donna Says
We’re Android/pc as well but at least she inspired me to get all our pictures off both our phones uploaded; we got a new pc about a year ago and hadn’t done them to it since we got it
Sarah Says
Great post Laura! Choosing a system for organizing photos can be such a challenge! I’ve finally created a system I like however I need to start using my photos now. I downloaded the Project Life App last year and have yet to use it. I hope you consider a post about using your photos and the app. : )
Merle Says
For the Android users: Google photo is a very good system (and app) to organise your photos and it is relatively cheap computer to IPhoto. I especially like it because it is easy to search in time and you can search nu location and ‘words’ of items in the picture. Lifesaver!
Kay Says
I like to organize much as you do: Year first, then subfolders with the month and event. And yes, delete, delete, delete! I prefer quality over quantity when it comes to photography. I have an iPhone 6S, and I look forward to getting one of the newer versions with the great camera. The 6S takes pretty good pics, though, but I can’t wait to have access to all the better features in newer versions. Recently, my 12 year old Canon EOS Rebel XT broke beyond repair. I was so fortunate to find a used replacement of that exact same camera for $150, so no need to purchase new lenses or other equipment. That should hold me until I’m due for my iPhone upgrade.
Brittany Says
I would love to see your Lightroom workflow!!
Bernadette Says
Great article?. Thank you so much.
I have on my laptop?, and take tons of photo? with my ?phone, and as you menld, I just don’t get around to filling,not to mention editing them. Or can I be honest and reveal that I don’t have the strenght.
Erica Says
Is there a storage solution where you can “tag”people in the picture, so that later you can (for example) filter and retrieve all pictures from 2017 that have “dad” in them? Another example would be to want to tag and filter pictures from particular activities (for me it’s “Cub scouts”) to make a year end slide show. Any Ideas???
Karen Says
I have a laptop and my pictures are all over the place. OneDrive (where I don’t want them to be), “pictures” file, a photo folder. I would like to get them all in one place that I can easily access. It seems like it is impossible to move things out of OneDrive.